Crafting with Leather
One of my many passions is motorcycles and riding, naturally, and something I have been wanting to do for a long time is to make some longer trips on my motorcycle. My first motorcycle was a Kawasaki Ninja 650r. It was on this bike that I fell in love with riding, and that I bought most of my motorcycle gear for. Since that time I have changed bikes twice, and now I have a Harley 1200 Custom. It is a great bike, its light weight but still large enough to be comfortable, it handles well and I love its burnt orange color. Rabbit trailing but the point is most of my gear that looked great with my Ninja does not look as good with the Harley, nor does it physically fit all that good.
So I have been Looking around for some new travel gear for the bike for a while. My issue always comes in that saddle bags start around 400$ a piece and the nice ones can often run you around 1500$ a set all in. Also, I swear 90% of everything for motorcycles is black. I don't dislike black but I made the mistake of discovering some brown leather bike accessories and decided that's what I wanted (1st world problems as they say). Being that I have an inclination for DIY I decided why not make them myself? Of course I would need to find some examples I wanted to work from and I had to learn what sort of materials I should be working with etc... After about four months of research I pulled the trigger and got a bunch of supplies!
I will do a post containing my research, but for now lets talk about my first use of it. In my research for example saddle bags, one company I ran across was Pack Animal. They are mixing leather and waxed canvas, and I just really dig the look. So I decided to use their products as the creative juice for my designs. Also, I will throw a word out for Saddle Back Leather Company, I have long loved their products and the owner has a lot of great information for learning about leather.
As materials are somewhat expensive I decided to start small, and try my hands at a tool roll. Pack animal makes a very nice tool roll, and I looked at their design and a few other companies in detail. Because I have never worked with waxed canvas before I decided it would be prudent to simply draw my design on paper, work out dimensions, and try to determine how I might craft the tool roll.
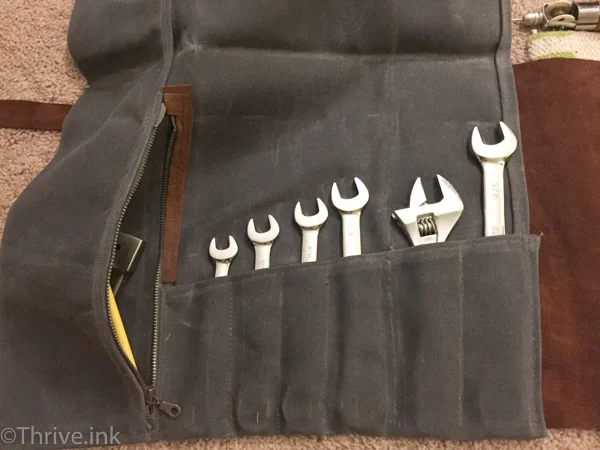
As can be seen, I wanted to be able to fit an 8 piece wrench set, some hex keys, and have a zippered pouch. What is not shown is a top flap that lay over the tools before rolling and more importantly keeps them from sliding out the side! It is probably hard to tell in the picture but it was drawn to scale (1:1). I did this on a large water color pad I had left over from an art class in college. I knew it would come in handy one day, just did not realize it would take 11 years...
Once again because waxed canvas is surprisingly expensive (~30-40$ a yard in small quantities), I decided that I would try my pattern cutting on some spare linen I happen to have. Let me say this ended up being an awesome idea! Initially I had planned to actually sew it but I instead just left it pinned so I could easily take it apart and inspect as I went through cutting my real materials later. While cutting out my pattern in the linen cloth and pinning hems I was able to determine how everything was actually going to go together and make some adjustments. I was also able to figure out what order to sew everything!


I was feeling really comfortable with the project once I got the linen cloth pinned up. By this time it was getting late, so I called it a night and started back on things with a fresh morning. The waxed canvas ended up being easier to work with than the linen. The waxed canvas is stiff and tends to hold a crease well, with a pin here and there my hems were very easy to make no ironing required. Something I will mention, when I started with the linen I cut it to the exact dimensions I thought I needed 25" x 23". This worked fine but when I went to do this on the waxed canvas, I noticed because it is 36" wide, doing this would end up leaving about a 11" x 23" piece of canvas behind which I wasn't sure I would ever use. So instead I cut the canvas intentionally longer than I needed and made it the 36" x 23". I allowed the extra length to exist on the side of the top flap, as that was one of the last edges I needed to hem. This allowed me to cut the flap so that it was exactly as long as I wanted, after I had sewn most of the tool roll. This ended up working out great and actually because I cut my flap at an angle my scrap piece ended up being larger than I would have originally left behind.
I must admit I was bad, and failed to take enough intermediate pictures but I am planing to make a second one and will take pictures and add them to to this post at that time.
The sewing order was as follows.
- Hem the zipper pouch edge and sew the zipper to it simultaneously.
- Fold the cloth over to create the zippered pouch.
- Cut angle for the cloth holding the wrenches and hem, then fold over.
- Hem the bottom of the pouch.
- Sew the open side of the sipper to the canvas (will add leather later)
- Note a portion of the zipper is under the cloth for the wrenches. I sewed that section as a part of sewing down the zipper.
- Fold over and cut the top flap, I chose to have a 1/2" seam allowance giving me a 1/4" hem
- Hem top flap and the right side of the tool roll (opposite side as the zippered pouch)
- Cut and lay leather for the visible portion of the zipper.
- Sew leather down, rotate 90 and sew the top edge of the pouch. I chose to sew this just shy of where I planned for the top flap to actually fold over.
- Run a second parallel row of stitches along the top edge of the zippered pouch to increase durability. I play to have small tools in there so I don't want them wearing out the stitches and getting lost while I am on a road trip.
- Grab your wrenches and place them in the open wrench pouch so you can measure exactly where to run stitches to creak individual wrench pouches/slots. I made the mistake of sewing my back cover leather on before this step. It ended up working out but, if those stitches had been 1/4" to the right or left it wouldn't have worked out!!! So lesson learned make your wrench slots first!
- Once you are happy with your slots, its time to cut some leather.
I wanted my leather piece to cover the back side entirely and about 80% of the front. I measured my tool roll and per my expectations, rolled up it was 12" tall and 6" wide (yay!). So I cut my leaver to be 12" x 11". With the tool roll empty the leather nearly covers both sides, but full (its about an inch thick) I get that nice gap I wanted on the front side. So for the leather, there is the way I did it and maybe the way you should do it. I am going to list the way I think I should have done it.

Sewing the straps and the strap holders on the leather flap.
- Cut two 3/4" wide by 25" long strips of leather.
- Cut one 3" long strips of leather off each of the ones you just cut, it make them 22" long ea.
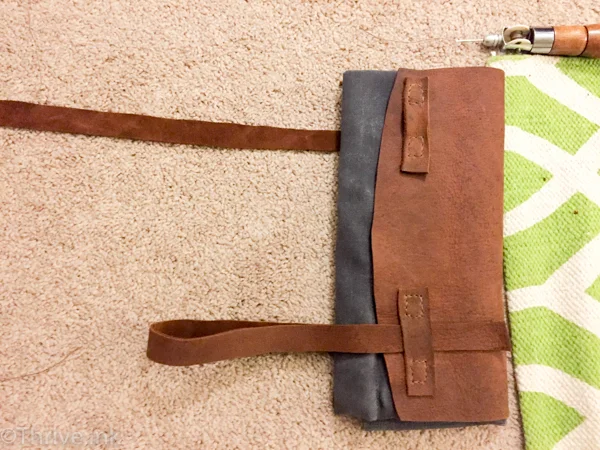
- take the 22" long leather strips and sew one end to the leather flap (see picture)
- Sew the 3" long pieces to the leather flap in line with the strips.
- Sew the leather flap to the bag.
So I did this in reverse order but it didn't matter too much as I was hand sewing the leather, still it will be easier if you just sew the leather together before you sew it to the tool roll.
Over all I was pretty happy with how it turned out. Its not exactly like anything I could have bought and I like that. Check out some images of the bag below.